Solar Light Installation Guide: Parts, Assembly, and MaintenancePosted by Stephen Shickadance in The Basics.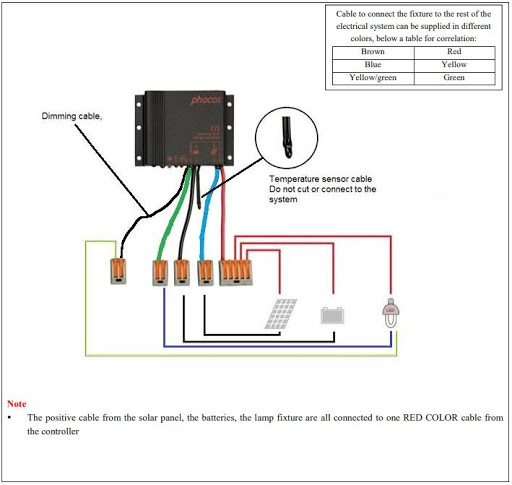
DOWNLOAD SOLAR LIGHTING GUIDE Believe it or not, it’s a lot easier to install a solar light than you might think. However, before you install the light, it’s important to review the entire manual before installing it. Improper installation is not the responsibility of Greenshine New Energy. This section is also less comprehensive than what you will find in our manual shipped with every light, but it's intended to give a general overview of the process and its simplicity. Solar Light Installation in a NutshellComponentsAll the components of a solar light come included in one box. This, however, doesn’t mean that all the tools you’ll need to properly install the light come with it. Here’s what comes shipped in the box:
The tools you’ll need to complete installation are below:
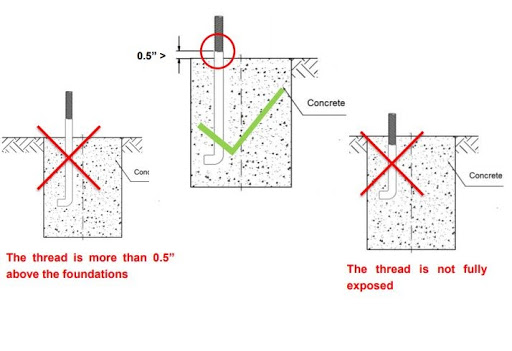
Installation SiteEnsure your solar light installation site is free of obstructions from access to the sun. Also, you’ll want to ensure there aren’t foreign light sources that can interfere with the panel’s light sensor. Keep the pole away from heat sources and ensure it’s on level, solid ground (we can accommodate if the soil isn’t the most sturdy). If the pole is nearby a body of water, place it so that the battery box will be safely above the waterline at all times. FoundationThe foundation should be poured by a qualified contractor. Check here to see a video on pouring the concrete. The PVC tube must be installed with the foundation. Once the concrete is poured, it’s recommended to wait 28 days for the concrete to cure. It’s very important for the concrete to cure because otherwise the foundation may lose stability and structure. You definitely don’t want a pole turning into a safety hazard. Two important components (we provide them) are a rebar cage and a sonotube to keep the anchor bolts in place and integrity intact, respectively. Use a hand level to make sure the surface of the foundation is flat. Make sure the threads on the bolts are fully exposed and not more than .5” above the concrete. Here’s an illustration for foundation construction help.
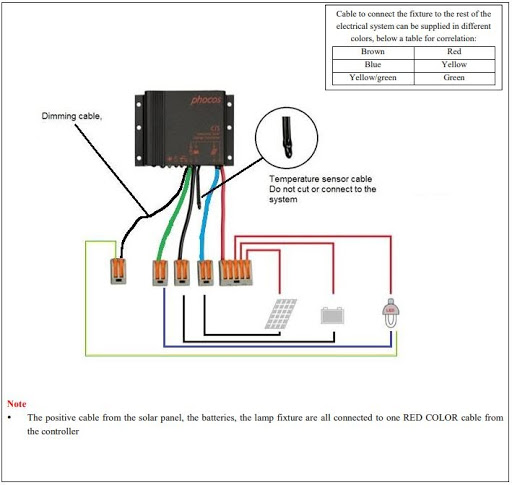
What to Check Before You InstallStudy this diagram below before installation. This will help you learn the electrical components.
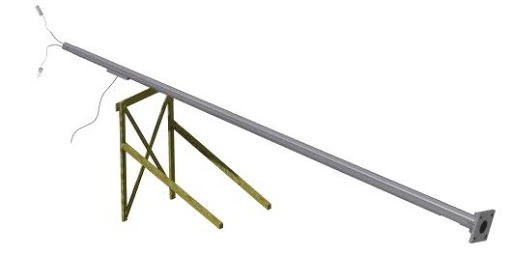
AssemblyPole AssemblyLean the pole on any kind of support. Ensure to leave enough space from the ground to the pole for arm assembly. Route the cables from the top hole of the pole to the battery box hole, like so below:
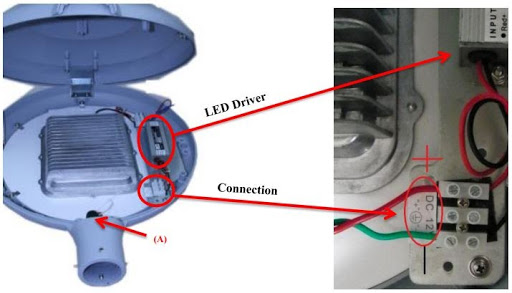
Once this is finished, pull the cables through the arm and then affix the arm to the pole with bolts and nuts. Refer to the bolts and nuts section for more information on those. Fixture AssemblyOpen the fixture and pull the cables from the arm into the fixture. Connect the cables to the LED driver and close it. Refer to the image below for help. Your fixture may look different than the one depicted below.
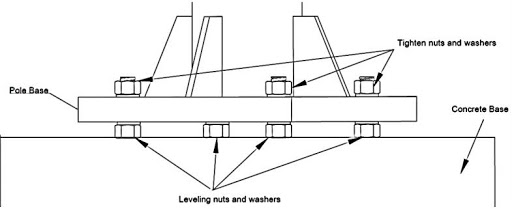
Slide the fixture onto the arm, level it, and then tighten the fixture with mounting bolts. Solar Panel and Brackets AssemblyBefore installing, verify that your inclination angle for the solar panel is provided. Greenshine includes the IA on the quotation. If it isn’t available, contact your manufacturer immediately. Assemble the mounting brackets together and affix them with bolts and nuts. Adjust the elevation angle according to the chart below: Next, fix the angle frame onto the bracket and fasten the bolts. Prepare an area to set the solar panel down on its face (a large cloth will do). Pull the cabling through the assembly while placing the assembly onto the back of the solar panels. Affix the mounting bracket to the solar panels with bolts and nuts. Connect the cables from the panels to the cables coming from the pole. Ensure the waterproof connectors are connected securely. Use a multimeter to test the panel voltage. This test must be done during the day. The voltage output of the panel must be around 20V (per panel). If the multimeter shows less, check the connectors. Once the voltage is confirmed, slide the panel onto the bracket on the pole. Adjust the panel direction so it will face the equator once the pole is erected. Secure the solar panel bracket with no less than 6 bolts so the panel can’t move. Ensure the bolts aren’t penetrating the panel. Next, find the 4 gauge holes on top of the pole. Each hole is half an inch wide. Use one of these holes to attach the solar panel assembly to the top of the pole. If there isn’t a hole that orients the solar panel towards the equator, you’ll need to drill a new hole. Battery AssemblyEnsure all the cables meant for the battery box are pulled through the battery box hole on the pole. Then, pull the cables through the hole on the battery box and mount the battery box with the provided U-bolts. Do not put the battery into the box just yet--it will make hoisting the pole much more difficult. Hoisting the PoleFix the hex nuts and flat washings onto the anchor bolts--each bolt takes two hex nuts and two flat washers. Next, use a crane or hoist to lift the pole and put it on its foundation, then affix the pole with a hex nut and flat washer. Use a level to adjust the height of the four leveling nuts--this is to ensure the pole is straight. Finally, use a torque wrench to tighten and lock all the nuts. Refer to the image below to see how your installation should work.
Testing the SystemDisconnect the solar panel cables--this simulates nighttime for the panels. After approximately 5 minutes, the LED fixture should turn on. Please contact your manufacturer if it does not. Ensure to reconnect the panels once you have confirmed a positive test. Battery InstallationBefore installing, ensure you have gone over the power diagram. Connecting incorrect cables, being careless with cables, or crossing the wrong polarity could short-circuit the system. Place the battery in the battery box and then connect the lamp fixture cables to the controller. Then, connect the battery cables to the controller. A green indicator on the controller will flash and then remain steady. Lastly, connect the solar panel cables to the controller. Is Maintenance Needed?Solar street lights are designed to be essentially maintenance-free. However, in certain regions with extreme conditions, some level of maintenance is required to ensure the proper function of the lights. These regions are typically where there is a risk of dust, snow, or ice covering the solar panels and thus reducing the power of the lights. In regions with frequent rain, the tilt angle of the solar panels allows for self-cleaning of dust. However, in places where rain is infrequent, periodic manual cleaning of the panels may be required. Here’s what a maintenance schedule would look like: Every Week: Inspection of street lights to ensure all the lights are working. If there are lights that are not lit, perform analysis to find causes and conduct repairs. Every 2 Months: Inspect street light panels and clean them which are covered with dust or sand. Use clean water to clean the solar panel from the top to the bottom with soft cleaning cloth. Every 5-7 Years: Replace the solar street light batteries if the voltages drop below normal levels. The battery has an expected life of 5-7 years. In ConclusionCongratulations, you’ve just installed your solar light! Remember, a more comprehensive manual is included inside of every solar light box along with full contact information for your manufacturer. Check out our content on maintenance and how long your components are expected to last.
The Basics
|
ArchivesNo Archives Categories
Want More Info? |
LATEST NEWS & ARTICLES
